The Geeni camera blinking red light is a common issue that numerous users face. Such issues could arise due to various reasons. The Geeni camera is a renowned security camera that provides high-quality security.
This camera is designed to offer impeccable monitoring capabilities. The Geeni camera has status LEDs through which you can find the camera’s status.
But it’s normal to face issues with your Geeni camera. The Geeni WiFi camera blinking red light is a common issue. You don’t have to worry, as you can quickly fix this issue.
If you are facing the Geeni camera flashing red light issue as well, we’ve got you. That’s why we have made this post to help users resolve this issue.
In this blog, we’ll discuss the reasons for the camera blinking red light. Moreover, we’ll also walk you through the techniques you can use to fix the issues with the camera.
What Does the Geeni Camera Red Light Mean?
The red light on the Geeni camera indicates the camera is looking for a WiFi network to connect with. This basically means the camera is in pairing mode. In this case, you just need to connect the camera to the WiFi.
Once the camera has a proper connection with the WiFi, the red light will be gone. If you don’t know the complete procedure to connect the camera to the WiFi, worry not. Further, we’ll explain the complete Geeni camera process. There could be other factors responsible for the red-light issue as well.
How to Connect the Geeni Camera to the WiFi?
The foremost thing you need to do to fix the Geeni camera blinking red light issue is to connect the camera to the WiFi. This should fix the issues if the Geeni camera is having trouble connecting to the WiFi.

To connect the camera to the WiFi, you will require the Geeni app. You can obey the below-mentioned instructions to set up the Geeni camera:
Download the Geeni App
You need to begin by installing the Geeni app on your mobile device. To connect the camera to the WiFi, you must have the app. Otherwise, you can’t set up the camera correctly. The Geeni app is available on both Play Store and App Store.
Add the Camera
Now, from the app, log into your account, if you have one. Otherwise, you can create your account from the app as well. Hereon, there are two methods you can use to add the camera to the app.
You can either scan the QR code or manually add the camera to the app. If your camera only supports the 2.4GHz network, then connect it to the 2.4GHz WiFi only.
Connect to the WiFi
Once the camera is added to the app, you must connect it to the WiFi. You must connect the camera to the WiFi to ensure proper functioning.
All you need to do is enter the network’s name and then type the right WiFi key to establish a connection. Give the camera some time to form a connection successfully.
Configure the Camera
When the camera has made a connection with the WiFi, you can customize the camera’s settings accordingly. There are several features, the camera offers, and you can use them from the app. Ensure to modify the settings accurately.
These are the steps to connect the camera to the WiFi. This should eliminate the Geeni WiFi camera blinking red light. If not, we’ll provide the troubleshooting methods you can use to fix the issues.
Troubleshooting Geeni Camera Blinking Red Light Issue
There could be internal issues with the Geeni smart camera as well causing the issues. You can use various methods to fix the Geeni Merkury camera blinking red light. Follow the below methods for fixing the issue:
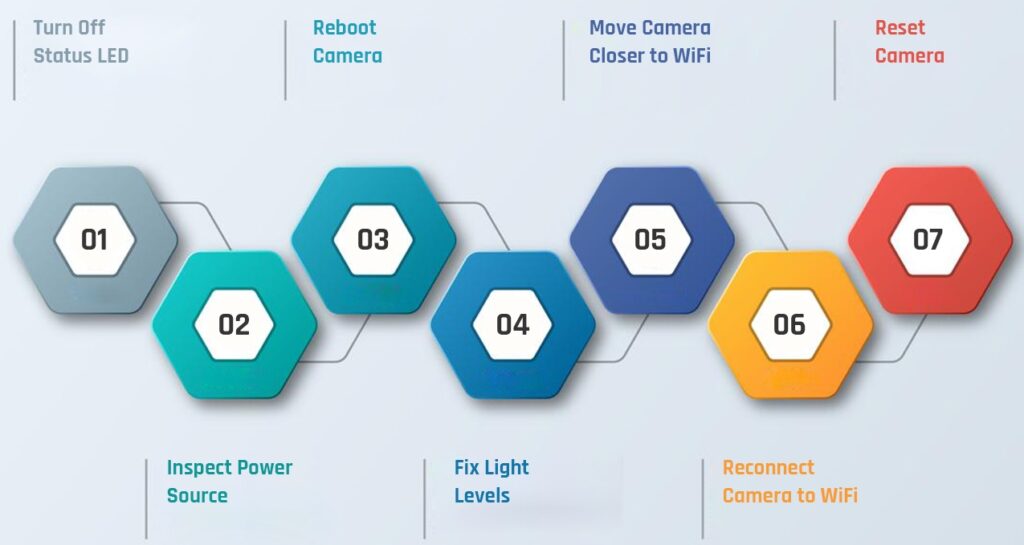
Turn Off the Status LED From the Settings
There’s a tiny chance you accidentally turned on the LED. But don’t worry, as you can easily fix this from the settings of the app. Now, from the app, select the camera you are facing the issue with.
Hereon, go to the Basic Feature Settings of that device. After that, you should see a setting to turn off the LED light. This might not be applicable to every Geeni camera. The red light should be off now.
Inspect the Power Source
The camera requires a stable power source for accurate functioning. Without a reliable power supply, the camera will not function at all. So, you must provide a working power source to the camera.
Inspect the power supply, the camera is currently plugged into and ensure it’s working. If not, you must provide another power source to the router.
Reboot the Camera
You can try rebooting the camera as well to fix the issues with the camera. The reboot eliminates any minor issues with the camera.
All you need to do is turn off and cut off the camera from the power source. After some time, you can power the camera back on. Now, the issue with your Geeni camera should be gone now.
Fix the Light Levels
The lights around the camera can also cause the Geeni Merkury camera blinking red. All cameras have an infrared system, which can cause red light issues due to poor lighting.
Thus, ensure to install the Geeni camera in a place with good lighting. You can consider relocating the camera or installing a light around the camera.
Move the Camera Closer to the WiFi
The lack of a proper WiFi connection can also cause red-light issues. When the camera is too far from the router, it can have trouble forming a connection.
Thus, ensure to install the camera inside the router’s range only. Otherwise, you can move the camera closer to the router now for a seamless connection.
You can also consider moving the router closer to the camera to ensure a proper connection. Now, you can try again with reconnecting the camera to the WiFi.
Reconnect the Camera to the WiFi
You can also try reconnecting the Geeni camera to WiFi. There could be some issues with that as well. So, disconnect the camera from the WiFi for some time. After a few minutes, you can try reconnecting the camera to the WiFi and the issue should be gone.
There could be issues with the WiFi router as well causing connectivity troubles. In this case, you must fix the issues with the router.
Reset the Camera
In the end, you can reset the geeni camera if none of the other methods are working. The reset will fix all issues with the camera. You can reset the camera manually or through the Geeni app. To reset it manually, locate the reset button on the camera.
Now, press and hold the reset button. After 15-30 seconds, you can let go of the reset button. The reset is successful and the issues you were facing should be gone now.
Moreover, you can reset the camera through the app as well. All you need to do is launch the Geeni app and select the device you want to reset.
Now, from the settings of the device, select the Remove Device option. Hereon, you can add the camera to the app again and set it up correctly.
Conclusion
We hope you understand the troubleshooting methods you can use to resolve the Geeni camera blinking red light issue. The red-light issue with the Geeni camera should be gone now.
In this blog, we discussed the methods you can use to fix the issue and the procedure. You should be able to set up the camera correctly. You can get in touch with our team if you require assistance with anything else.
FAQs
The Geeni camera blinking blue light indicates the camera has lost the internet connection. In this case, you must reconnect the camera to the WiFi. This issue could arise due to several reasons. You can try power cycling the camera to fix the issues with the camera.
No, the camera should be connected to a strong WiFi network for optimal functioning. Without a stable WiFi connection, the camera will not function at all. Thus, ensure to link the camera to the WiFi. To connect the camera to the WiFi, you require the Geeni app.
There’s no particular answer to this question. There are two methods you can try for connecting the camera to the WiFi. You can either try changing the WiFi network from the Geeni app. Or you will have to reset the camera and then set up the camera with the new WiFi.
The Geeni camera offline issue arises when the camera either doesn’t have a power source or a proper WiFi connection. You must plug the camera into a stable power source to get the camera back on track. Also, fix the issues you are having while connecting the camera to the WiFi. This should fix the offline issue.